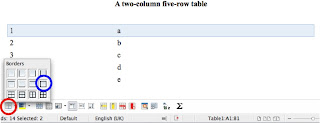
An example explains it quickly.

Note that there is no border between cells and that the even rows don't show borders.
Here is how to do this.
Create table
The first step of course is to create a table in writer via Insert -> Table and choosing 5 rows. Then fill in the cell contents as displayed above, the result being
Remove all borders
The next step is to clear all borders. There are two ways to do this, I'll show one.Click any table cell and choose Table -> Table Properties.... Click on the Set No Borders icon (circled red) and OK.

This will result in this table.

Adding row borders
For this and the following steps you should enable the table toolbar via View -> Toolbars -> Table which will display a new toolbar at the bottom of your LibreOffice window.It is easy to set the border for one row:

which should result in this

The cumbersome thing is: one needs to do this for each row individually, in my case rows 3 and 5.
As one can see this is not feasible for big tables (say 20 rows or more) and there is also no easy way to change this later (if you suddenly wanted a different border setting with no borders on the left you would need to redo these steps for all rows again).
I haven't found a nicer way to do this. Trying to mark non-consecutive rows 1, 3 and 5 did not work, in essence there doesn't seem to be a way at all in LibreOffice (or OpenOffice.org) to mark non-consecutive rows in writer (I'd be glad if someone showed me a more efficient way to set the borders).
Anyway: with this approach I finally got my table as outlined at the beginning.
Some more customizations: line style and colour
Further customizations are again quite easy. First of all you always have to select the whole table (either by marking all cells or by clicking in the left cell in the first row and then shift clicking the left cell in the last row).
Then one could set the line style by clicking the line style icon (red circle) and then choosing from the list (the blue ellipse chooses the very last entry).

After that the table is still marked and one could continue to set the line colour by clicking the colour icon (red circle) and choosing a colour (blue circle).


No comments:
Post a Comment